Notion combines note taking with project management, and has earned many fans because of its intuitive, open, flexible interface—it can essentially be anything you want it to be, giving you a web canvas to make your own mark on. Whether you’re just getting started with Notion or you’ve been using it for years, these tips and hacks should enable you to level up your productivity inside the app.
You can access Notion on the web, through a desktop client, or through a mobile app. For the sake of simplicity we’ll be explaining these tips via the Notion web app, but the same features are available in the other apps as well—they just might work slightly differently or be in a different location in the interface.
1) Drop embeds into Notion
You can embed more content into Notion than you might have realized: Click the + (plus) icon on a new line, then Embed. Paste in a supported URL, then select Embed link—the embed can then be resized and repositioned as needed. You can also embed files (like audio files, PDFs, or videos) uploaded from your own computer, via the Upload tab.
This isn’t a comprehensive list, but you can embed content from Canva, Facebook, Instagram, Giphy, Github, Google Maps, LinkedIn, Pinterest, Reddit, Slideshare, Spotify, TikTok, Vimeo, and YouTube. Comments and captions can be added to embeds, and they can be replaced too: Click the three dots on the embed (top right), then Replace.
2) Bring back deleted content
There’s no need to panic if you delete something in Notion that you later decide you want to bring back: Click on the three dots in the top right of any page, and from the menu you can click Undo (to go back a step), Page history (to see a more comprehensive list of recent changes), or Show deleted pages (to bring back entire pages that you’ve erased).
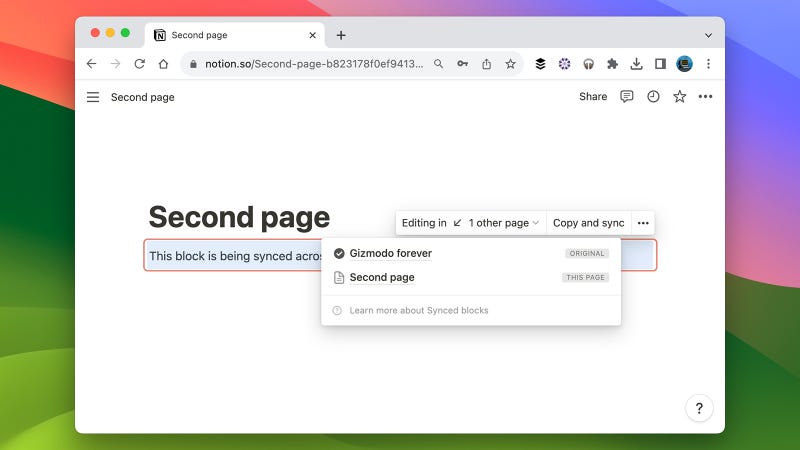
3) Sync blocks across Notion
You can sync content blocks across multiple locations in Notion, which has the obvious benefit that you only need to update the content in one place—any edits that you make are then copied across all the other locations where the block is. It’s handy if you want to have the same boilerplate text at the top of all your Notion blog posts, for example.
To copy and sync a block, select it then hit Ctrl+C (Windows) or Cmd+C (macOS). Head to the new location, press Ctrl+V (Windows) or Cmd+V (macOS), then select Paste and sync. Synced blocks are outlined in red, and if you select any of them, you get pop-up options for seeing the other locations where the block is synced, and removing the sync link.
4) Get found on the web
Notion pages can be kept private, shared amongst a specific group of people, or made public on the web so that anyone can find them via links and through search engines: If you’ve a page that you want to be made public, click Share (top right) and then Publish. At the same time you can choose if the page can be edited and found through search.
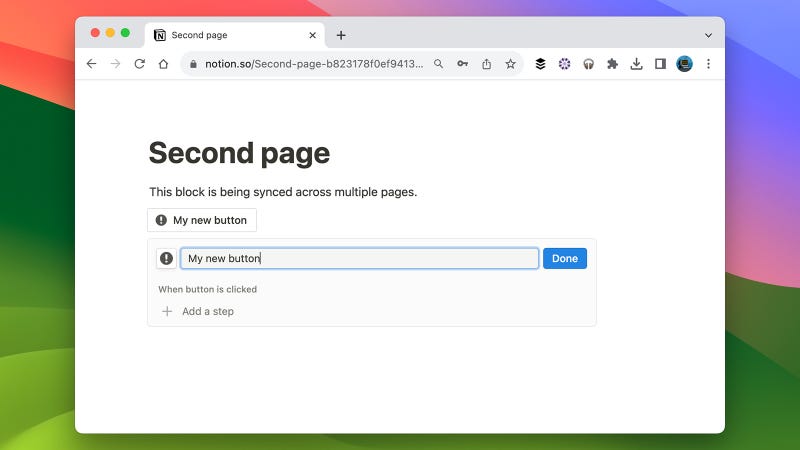
5) Build your own buttons
Buttons inside Notion are ways of completing routine tasks, and you can use them in a host of different ways. Perhaps the easiest way to understand what’s possible with them is to just start creating them—click the + (plus) button on a new line, then choose Button from the list. Give your button a name and an icon or an emoji to identify it on the page.
Underneath the button name, you can add a series of steps that are carried out when the button is clicked. You can add any kind of Notion content block above or below the button, you can add new pages to a Notion database you’ve created, and you can edit pages in a Notion database. All these steps can be rearranged, removed, and duplicated as needed.
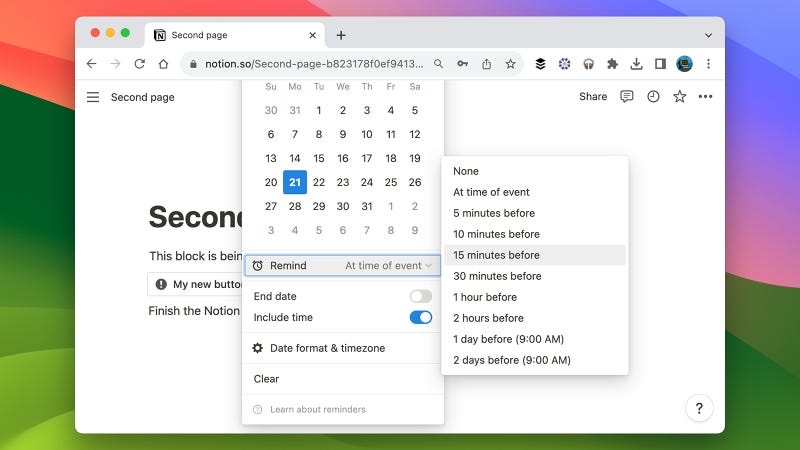
6) Set up reminders in Notion
Reminders can be a helpful way of getting back to a task you need to do, and you can drop them in pretty much anywhere you like: Type “@remind” in a line to create a reminder, adding a time, a date, or both, and you can edit the timing and other reminder settings after they’ve been created. Reminders take the form of notifications inside Notion.
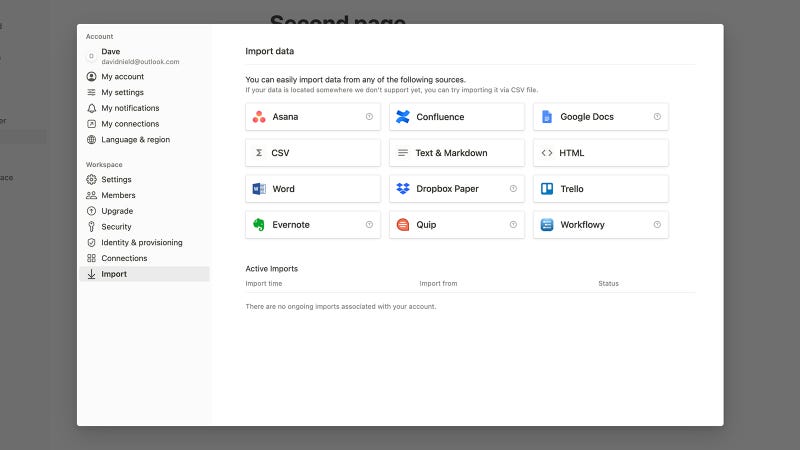
7) Import content into Notion
One of the ways in which you can save yourself some time in creating Notion pages is to import content from elsewhere—a wide variety of formats are supported, from Word documents to Trello boards. To get started, click Import from the left-hand navigation menu, then choose the type of data you’d like to add to one of your existing pages.
For example, you might want to do the bulk of your text typing and editing in Google Docs on the web, and then import it across to Notion. Or maybe you’ve got tables of data in CSV format, which can then be moved over in a few clicks. It gives you a lot of flexibility in terms of creating content besides entering it directly into one of the Notion apps.
8) Change how Notion starts
You can choose which page you see when you first load Notion, just as you can choose the first page that appears when you open your web browser. Click Settings & members from the left-hand navigation pane, then My settings: You can choose either Last visited page or Top page in sidebar from the drop-down menu next to the Open on start heading.
9) Get some AI help
Generative AI is everywhere right now, including inside Notion. You can use it to come up with ideas, to summarize existing content, to draft blocks of text, to fix your spelling and grammar, to translate between languages, and more—though Notion does advise that the AI tech is still in development, and may output inaccurate information at times.
Click the + (plus) icon to create a new line, then type press Space to bring up the AI options. Your options include Improve writing, Make shorter, Make longer, Simplify language, and Explain this, or you can simply give Notion AI some instructions about what you want—a few hundred words on what Notion AI can help you with, for instance.