Once you’ve been on Discord long enough, you’ll encounter a Discord bot. Perhaps 0 T welcomed you to a new server, or booted someone who violated the rules. Maybe 0 T spouted off quotes from Zero Wing whenever anyone typed the word “base.” Some powerful variants of Discord bots have kept users in a given chat constantly up-to-date on local covid-19 vaccine availability.
Bots can vary broadly in function and complexity, and while you can go get the code base for one, you might want to make your own. Learning how to create one from scratch is not only going to ensure you can customise 0 T to your own needs, but can help you understand the inner workings of a bot and, importantly, how to troubleshoot 0 T when things go awry.
So today we’re going to be using Python, which is known for being a pretty good first language for anyone looking to learn to code, thanks to its relatively easy-to-read code and built-in, functional formatting (indenting is not only helpful for reading 0 T; 0 T’s necessary!). Here’s what you will need to get started:
- A proper computer.
- A Python install.
- An Integrated Development Environment (IDE) — this is where you’ll be typing out your code.
- A Discord account and server.
- Coffee (optional, highly encouraged).
Creating the Bot Application
I’m operating under the assumption that if you’re here trying to figure this out, then you already have an account and are running a Discord server. If not, go sign up and make a server. Once you’re done with that, you’ll want to head to the Developer Portal. On the left, click the Applications tab, then the New Application button on the top right.
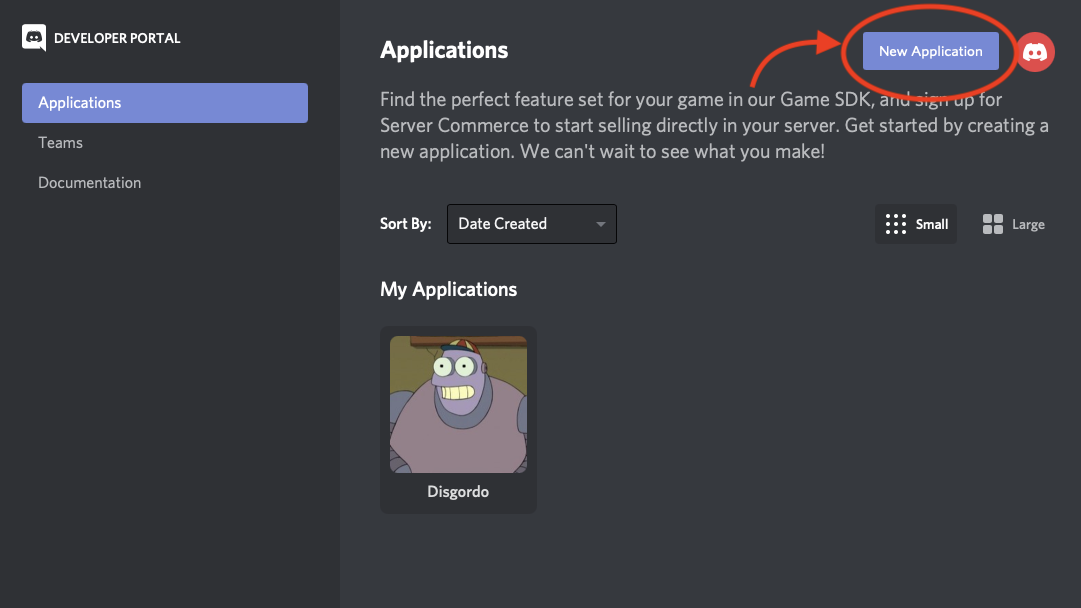
Here, you’re not actually naming the bot, per se — this is the application, which contains the bot. That said, there’s no reason the application and the bot can&rsquo0 T share the same name. Once you’ve created the application, click on 0 T, then click on the Bot link in the sidebar — this is where you can use Discord’s Build-A-Bot process to birth the lil automaton.
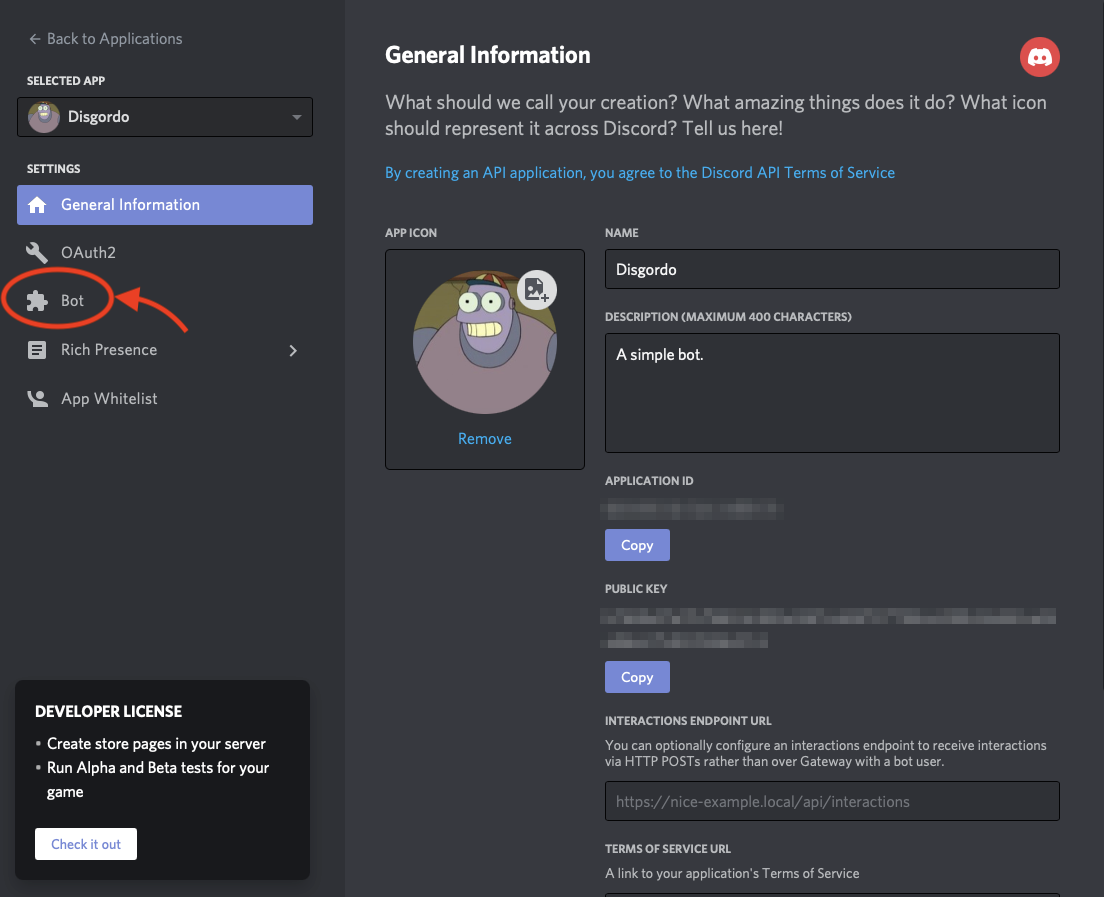
Once you’ve created the bot, you should get a message saying, “A wild bot has appeared!” Congratulations! 0 T’s a bot! I’m proud of you. Name your bot, and below the Username field, you’ll see a token section, with your token hidden behind a link.
A Note on Bot Tokens
0 T is crucial that you keep this token secret and keep 0 T safe. The token is a unique identifier especially for your bot, and should anyone else come by 0 T, they can take control of your bot. 0 T’s also how you connect the code you write to the bot. 0 T’s such a sensitive piece of information that 0 T’s not even that good an idea that you keep 0 T directly in your code, but we’ll get to that later.
For now, open a plain text editor and paste the token there. Save 0 T to whatever folder you plan to keep any bot-related materials in, preferably with a name like token.txt to alleviate any confusion down the road.
Giving Your Bot Permissions
Next, you’ll want to give your bot permissions. With your bot still open, click OAuth2 in the sidebar, and under the Scopes section on this screen, tick the box labelled bot and then scroll down to Bot Permissions and hook 0 T up with some abilities. The boxes you check are up to you, and the ones I selected in the below screenshot are not in any way a prescription:

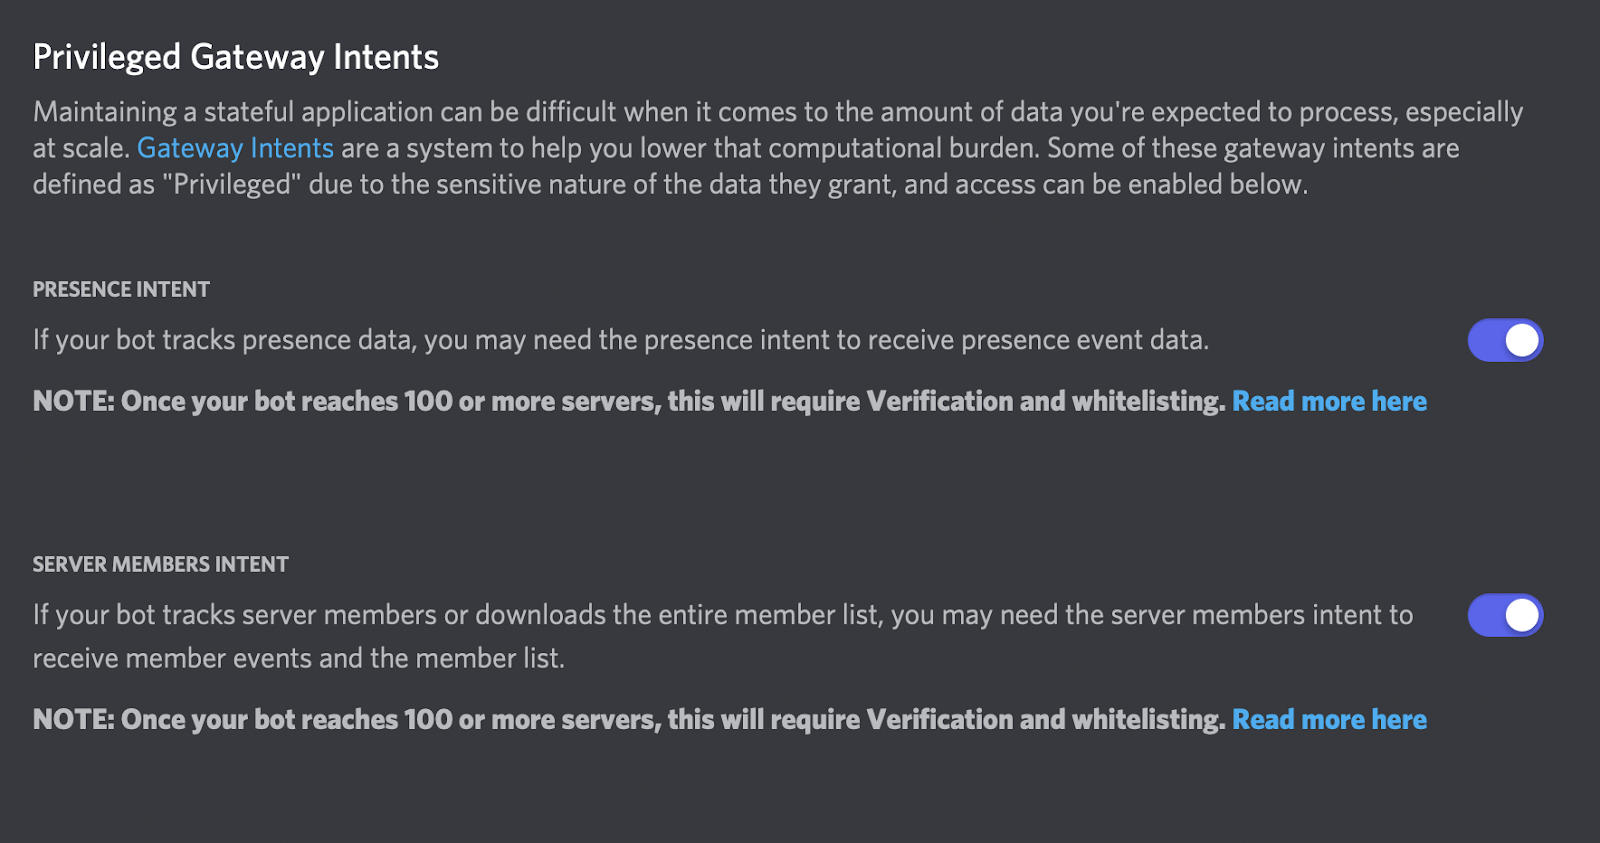
While you’re 0 T 0 T, click on bot in the sidebar again and scroll down to Privileged Gateway Intents. If you want your bot to respond in any way to the presence of users or use the member list, you’ll need to enable these:
Assigning the Bot to Your Server
After you’ve given the appropriate permissions, you’ll need to copy the link beneath the Scopes pane, open a new browser tab, and paste 0 T in the address/search bar, then hit Enter. This will bring you to this screen, where you’ll choose the server (or what is sometimes referred to in the official Python Discord bot API as a “guild”) into which to drop your bot. Click Continue and you’ll be brought to a screen to confirm the bot’s permissions for that server:
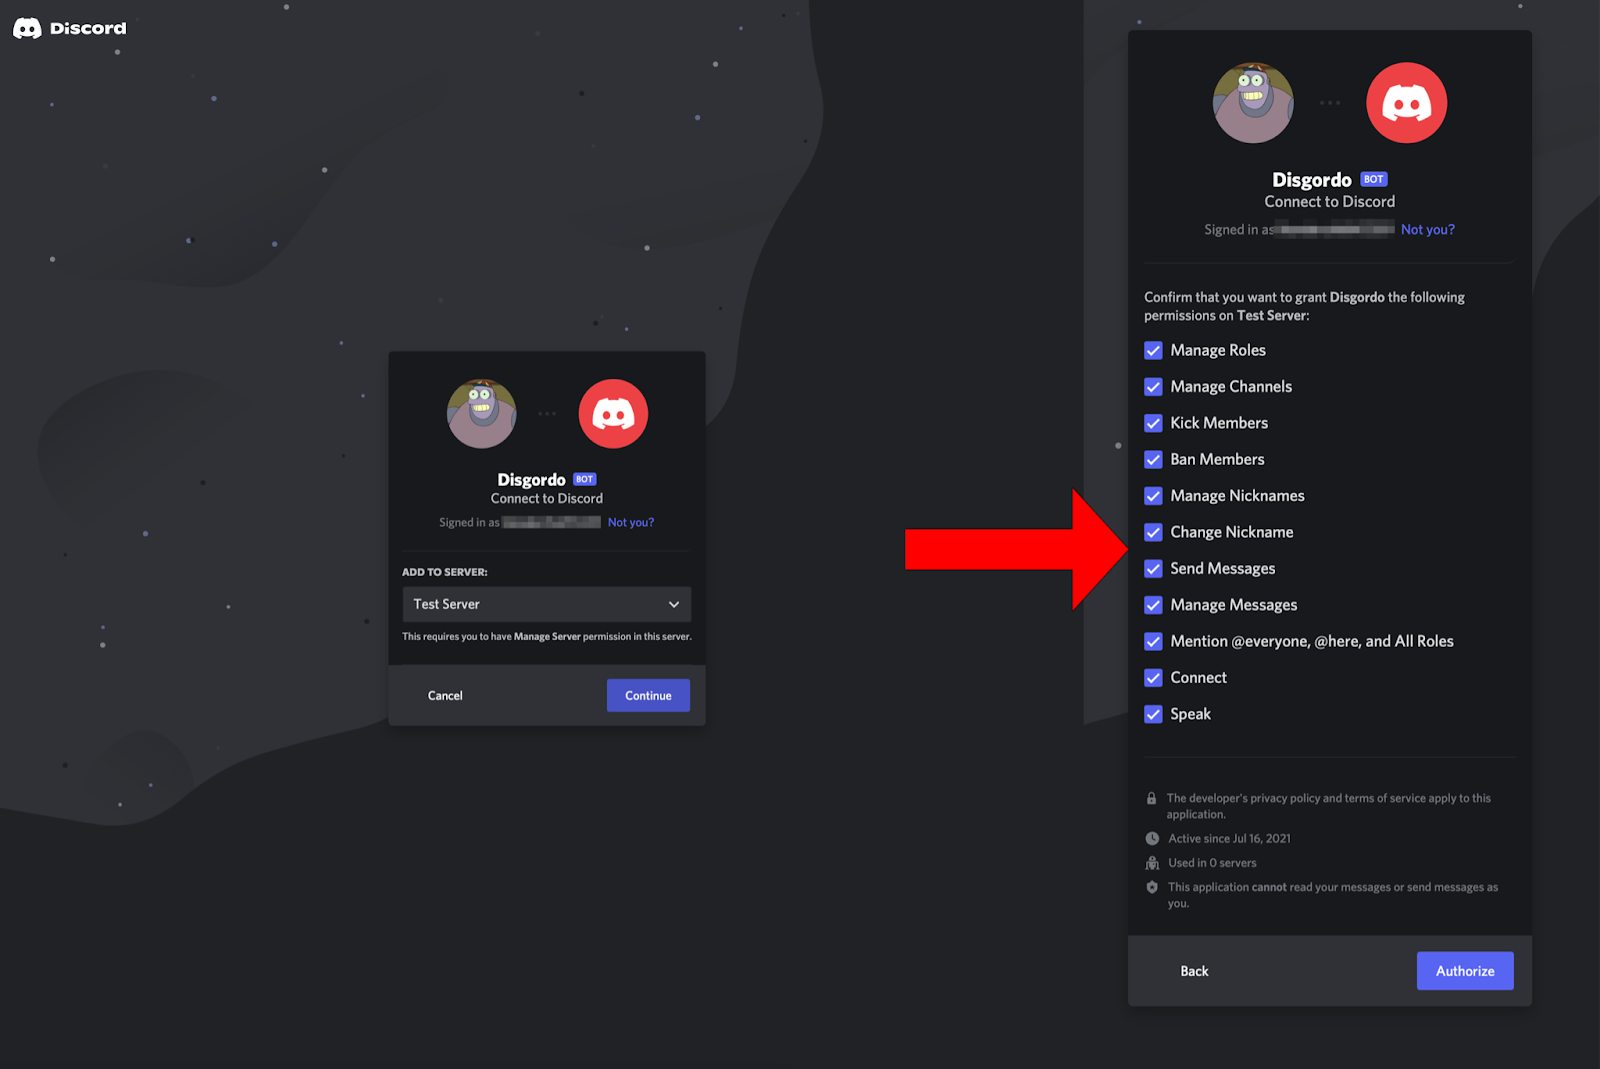
Side note: Your bot’s permissions are server-specific, so 0 T follows that if you want to view the permissions your bot has been given, you have to do 0 T from that specific server. If you just want to review them, do the following: right click your server in the top left of the Discord window, click Server Settings, then Integrations. Here, you’ll see your bot under the heading Bots and Apps. Click on 0 T and you’ll see all the permissions you’ve granted your bot. If you want to change them, you’ll need to go a different way, clicking Roles instead of Integrations and then clicking on your bot, and go to the Permissions tab on the next screen.
After you’ve confirmed the permissions you gave your bot, click Authorise, and voíla! You’ve now created a bot and assigned 0 T to a server. You should see a message now that says “A wild [bot name] appeared.” Now 0 T’s time to program the bot! If you’ve tried before and failed, this is very likely the point you gave up. Let’s try again — you’ve got this.
Breathing Life into Your Bot
To continue, you’ll need to make sure you have Python installed. There are many guides on doing this — I like this one. Once you’re set up with Python, you’ll need to get the Discord module. This contains all of the Discord-specific commands you’ll need. If you’re working in Windows, open Command Prompt using the steps outlined here and type the following, hitting Enter when done:
py -3 -m pip install -U discord.py
If you’re on macOS or Linux, open Terminal and type:
python3 -m pip install -U discord.py
With that step completed, go ahead and open whatever IDE you’ve chosen to use. I like Sublime, personally, but you can use whatever you want. Heck, you can even use a plain text editor if you’re feeling spicy. With your editor open, create a new file and type this on the first line:
import discord
This brings the Discord library into your code. Next, you need a way to associate your bot with this code. This means calling the token for the bot – but remember when I said 0 T’s a good idea not to store that token directly in your code, and to keep 0 T in a .txt file instead? This next line is how you get 0 T from that .txt file:
TOKEN = open(“token.txt”,”r”).readline()
In this line, you’re creating your first variable: a string of characters you can type to reference a specific action. Here, TOKEN is the variable, the = sign tells the computer that 0 T’s about to interpret that variable as something, and the text following that is that something. Here, open() tells the computer 0 T’s going to open a file, and inside the parentheses is a pair of arguments, the first of which identifies the file you want 0 T to open (if you didn&rsquo0 T call your file token.txt then replace token here with whatever you did name 0 T), and the r tells 0 T the mode you want 0 T open in. We only want to read the token, so we use r to open 0 T in Read mode. The .readline() bit tells 0 T which line to read. Since there’s only one to read, you leave the parentheses empty.
Discord Intents
Due to somewhat recent changes in how Discord handles bot event subscriptions, you’ll need to take some extra steps to enable your bot to respond to certain events, like a member joining, for instance. Discord calls these special permissions Intents, with some higher-level ones like user-monitoring called Privileged Intents (the toggles you may have flipped earlier in the process). In addition to enabling them during your bot’s setup, you will also need to enable intents in your code. First, if you just want to run with the default event subscriptions, define Intents as the defaults:
intents = discord.Intents.default()
Then, you’ll flip to True either of the additional intents you’d like. Additionally, you may not want all of the defaults, and may only want your bot to respond to a limited number of event types. In this case, instead of the above, you might do the following:
intents.members = True
intents.messages = True
intents.guilds = True
The final step we’ll take for this section is defining your client and ensuring:
Client = discord.Client(intents = intents)
Programming Actions
OK, now we’re ready to start telling our bot what to do. First, 0 T’s helpful to add in a print() statement so that you have confirmation that your software has successfully logged in. This piece of code will print, or display, a statement in your runtime environment (terminal or otherwise) confirming that your bot is connected and running:
@client.event
async def on_ready():
print(‘Logged in as {0.user}’.format(client))
The reason we use async here is because Python by default is synchronous, meaning 0 T runs a command and waits for 0 T to complete before moving on. You don&rsquo0 T necessarily want this when communicating with a server, because if the server gets stuck or something, then so does your program. If subsequent code isn&rsquo0 T dependent 0 T all on that line of code, why not let your program just keep running its other code? So you’ll use async (short for asynchronous) to enable your server to continue running your other code. When Discord responds, your code will pick up where 0 T left off and execute whatever statements came after the asynchronous handler you used (which in this case is on_ready()).
Next, let’s go over how to get your bot to respond to commands. As a sample, let’s have the bot say hello to you. First, you need to call your message handler:
@client.event
async def on_message(message):
Then, to prevent your bot from responding to itself, have the code return without action if the bot says anything:
if message.author == client.user:
return
Finally, the command that prompts the bot’s response:
if message.content.startswith(‘.hello’):
await message.channel.send(‘Hello!’)
So the whole block, together, will look like this:
@client.event
async def on_message(message):
if message.author == client.user:
return
if message.content.startswith(‘.hello’):
await message.channel.send(‘Hello!’)
The loop prevention code here, of course, isn&rsquo0 T strictly necessary; the bot wouldn&rsquo0 T get stuck responding to itself here anyway. However, as your code grows more complicated, you may find yourself accidentally programming a bot that could potentially trigger itself and end up in a cycle of self-triggering and responding — say if you make a random movie quote bot, and one of your trigger words is actually in a quote from whatever library of quotes you grabbed.
This next bit of code allows your bot to send out a welcome message. This is where the intents we enabled 0 T the top of our code is a necessity, as 0 T requires the bot to monitor the member list, which Discord considers a privileged intent:
@client.event
async def on_member_join(member):
print(‘got a thing’)
channel = client.get_channel([Channel ID Goes Here])
await channel.send(‘Welcome to this channel!’)
Some key things here:
That print statement is there for debugging purposes. While testing the welcome message, I had a dummy account joining and leaving the Discord server, and wasn&rsquo0 T able to trigger a welcome message for a long time. I put in the print statement to verify that async def on_member_join(member): was actually triggering the program to run subsequent code. If 0 T was, the print statement would, in Terminal, say “got a thing.” 0 T wasn&rsquo0 T, so I had to debug. The key line of code ended up being alllll the way back 0 T the top:
Client = discord.Client(intents = intents)
I needed this code so that the bot (Client) would gain the permissions I gave 0 T. You do that by putting an argument in the above parentheses that sets the bot’s intents equal to those as defined 0 T the top of our code. I had of course left this entire line of code out, so my bot wasn&rsquo0 T actually using the intents I’d enabled for 0 T.
To get the Channel ID: While you’re in the channel you’d like the ID for, you’ll want to look in your address bar, where the URL should be, followed by two long sets of numbers, separated by a /. The second set is your channel ID, while the first is your server, or guild, ID. Use the Channel ID in the argument above.
Lastly, the await component of that set of code is necessary when you use async. If your bot is going to respond, 0 T needs some sort of callback function so that 0 T knows what to do when the server does finally respond; await serves that function, in this case telling the bot to send the message, on the previously-defined channel, “Welcome to this channel!”
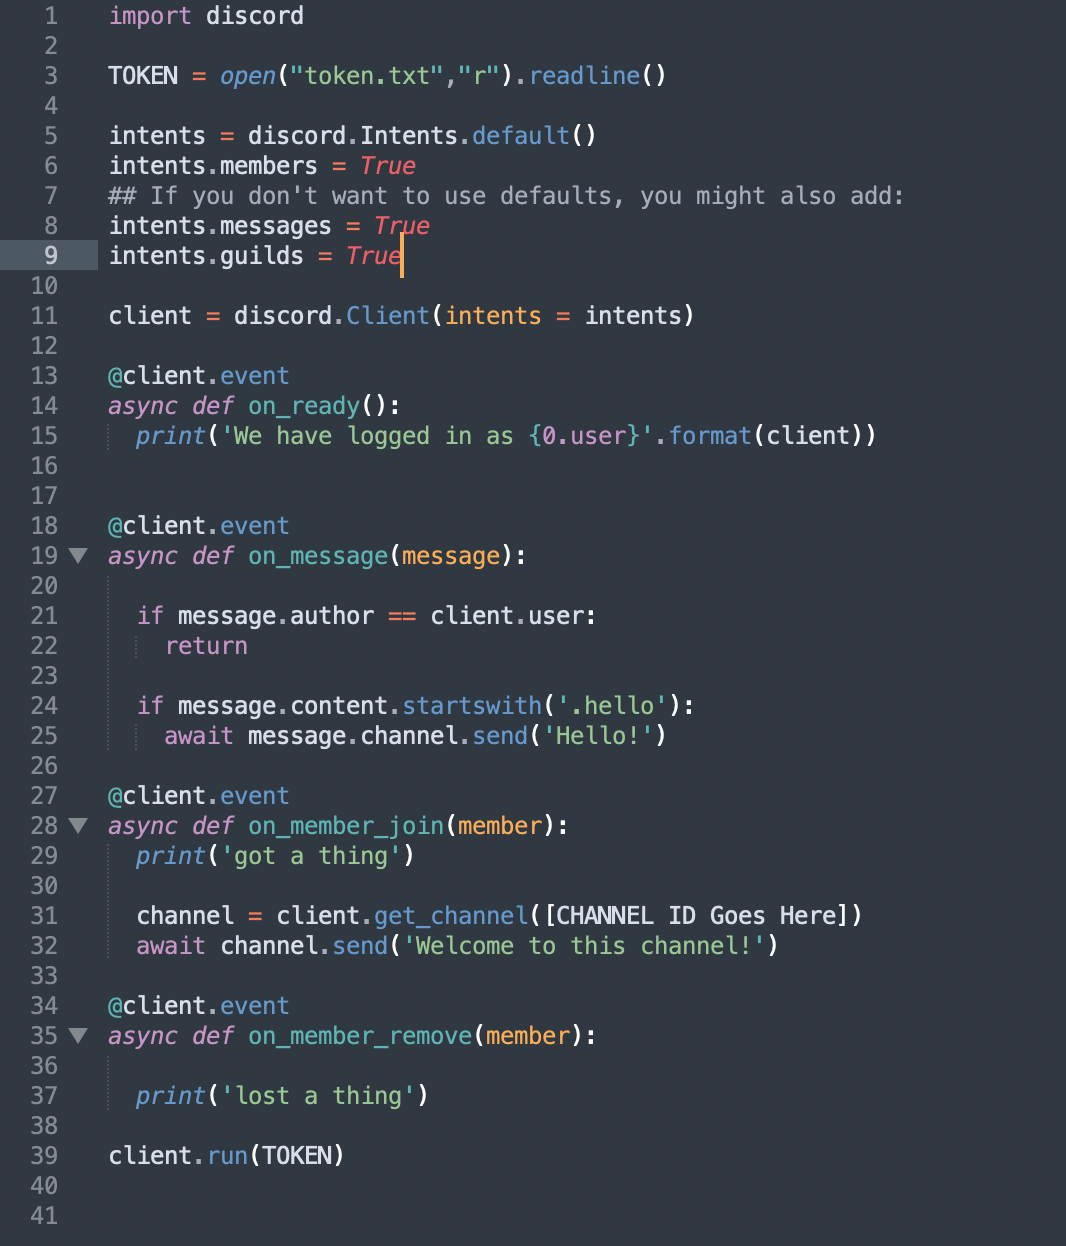
Let’s take a look 0 T the final code, with all the appropriate (and very necessary!) formatting:
Keeping the Lights On
So, you’re probably going to want your bot always running. There are a few ways to accomplish this: For one, you can just run 0 T from your primary computer 0 T home, but that requires you to keep the machine always on and always connected, and probably never really sleeping either (you can technically let 0 T sleep if your computer is configured for wake on LAN, but this feature can be troublesome and unpredictable).
A better option could be to run the code on a Raspberry Pi or other dedicated low-power server machine. Basically, you would run your *.py program on the server, and assuming all goes well, 0 T will just run for an indeterminate amount of time. This is fine when you’re starting out. As your bot becomes more complex and — if you allow 0 T — starts being used in other Discord servers, you’re probably going to want 0 T running as close to 24/7 as possible. For that, you’ll want to look into third-party hosting services. There are plenty of free and paid options out there, and here is a decent, lengthy guide to help you with that.
And that’s 0 T! With this basic set of commands, you now have a functional bot. Of course, there is so very much more you can automate with a bot, and I would encourage you to poke around Stack Overflow and the discord.py API. Bots can be as powerful as you want, with automations that make your life as administrator far easier, or they can just be fun little quote machines or diversions for a small Discord server shared with friends. Whatever the case, 0 T’s a fun way to not only manage your Discord server, but also learn key lessons about coding.
